In this tutorial, we will see how to create an email subscription feature in any Django application. This is a valuable feature to have on your site to retain visitors. You can send periodic newsletters or new article/tutorial notifications to users.
We have divided the complete process into below mentioned topics.
- Displaying email subscription page.
- Validating email.
- Sending confirmation and verification link to that email Id. Create database entry.
- Validate the clicked link parameters and update the subscription status to confirmed.
- If the user clicks unsubscribe link, validate the link parameters and unsubscribe the user.
Email Subscription Page:
Create an HTML Page in your app's template directory, extend the parent HTML file if required. Place the below code in this file.
subscribe.html:
<div style="border: 1px solid darkgreen; border-radius: 2px; padding:10px; text-align: center;">
    <div><strong>SUBSCRIBE</strong></div>
    <div style="margin-bottom: 10px;">Please subscribe to get the latest articles in your mailbox.</div>
    <div>
        <form action="{% url 'appname:subscribe' %}" method="post" class="form-horizontal">
            {% csrf_token %}
            <input type="email" name="email" class="form-control" placeholder="Your Email ID Please" required>
            <br>
            <input type="submit" value="Subscribe" class="btn btn-primary btn-sm">
        </form>
    </div>
</div>
Add URL entry in the app's url.py file.
path(r'subscribe/', views.subscribe, name='subscribe'),
Validate Email:
Now create a view subscribe in views.py file. I have written a separate utility function to validate the email addresses.
post_data = request.POST.copy()
email = post_data.get("email", None)

error_msg = validation_utility.validate_email(email)
if error_msg:
    messages.error(request, error_msg)
    return HttpResponseRedirect(reverse('appname:subscribe'))
Function validate_email return error messages based on errors in the provided email.
validation_utility.py:
import re
from appname.assets.blocked_emails import disposable_emails

def validate_email(email):
    if email is None:
        return "Email is required."
    elif not re.match(r"^\w+([-+.']\w+)*@\w+([-.]\w+)*\.\w+([-.]\w+)*$", email):
        return "Invalid Email Address."
    elif email.split('@')[-1] in disposable_emails:
        return "Disposable emails are not allowed."
    else:
        return None
So we are checking if the email is not null. Although this can be checked at the client-side (in browser) as well, it's always good to double-check things.
Next, we are checking if the email is a valid email address using regular expressions.
At last, we are checking if the user is trying to use disposable emails. If you want to allow users to use disposable emails, remove this elif part. A list of all disposable email hosts is available here.
If no validation error is returned by validating function, we proceed, otherwise, we use the message framework to display the error message and return to the subscription page.
Create Database Entry:
If email validation is successful, we save the email to the subscription table with status as subscribed, which will be changed to confirmed once the user confirms the subscription by clicking on the link.
subscription_model.py:
from django.db import models


class SubscribeModel(models.Model):
    sys_id = models.AutoField(primary_key=True, null=False, blank=True)
    email = models.EmailField(null=False, blank=True, max_length=200, unique=True)
    status = models.CharField(max_length=64, null=False, blank=True)
    created_date = models.DateTimeField(null=False, blank=True)
    updated_date = models.DateTimeField(null=False, blank=True)

    class Meta:
        app_label = "appname"
        db_table = "appname_subscribe"

    def __str__(self):
        return self.email
view.py snippet to save the email.
def save_email(email):
    try:
        subscribe_model_instance = SubscribeModel.objects.get(email=email)
    except ObjectDoesNotExist as e:
        subscribe_model_instance = SubscribeModel()
        subscribe_model_instance.email = email
    except Exception as e:
        logging.getLogger("error").error(traceback.format_exc())
        return False

    # does not matter if already subscribed or not...resend the email
    subscribe_model_instance.status = constants.SUBSCRIBE_STATUS_SUBSCRIBED
    subscribe_model_instance.created_date = utility.now()
    subscribe_model_instance.updated_date = utility.now()
    subscribe_model_instance.save()
    return True
If an email already exists in the table, we resend the confirmation link, else we create a new entry, and then send the confirmation link. You can modify the logic according to your requirements.
Send Email:
Create a token which we will verify when the user clicks the confirmation link. The Token will be encrypted so that no one can tamper with the data.
token = encrypt(email + constants.SEPARATOR + str(time.time()))
We discussed Encryption and decryption in Django in another post. Please refer to this article.
Now create a confirmation link. It will be the absolute URL as it will be clicked from Email (and not from your site).
subscription_confirmation_url = request.build_absolute_uri(
    reverse('appname:subscription_confirmation')) + "?token=" + token
Now send the email.
status = email_utility.send_subscription_email(email, subscription_confirmation_url)
I have written the email-related code in a separate utility class. It is always good practice to refactor the code and not to write longer functions. We will be sending emails using Mailgun API.
email_utility.py:
import logging, traceback
from django.urls import reverse
import requests
from django.template.loader import get_template
from django.utils.html import strip_tags
from django.conf import settings


def send_email(data):
    try:
        url = "https://api.mailgun.net/v3/<domain-name>/messages"
        status = requests.post(
            url,
            auth=("api", settings.MAILGUN_API_KEY),
            data={"from": "YOUR NAME <admin@domain-name>",
                  "to": [data["email"]],
                  "subject": data["subject"],
                  "text": data["plain_text"],
                  "html": data["html_text"]}
        )
        logging.getLogger("info").info("Mail sent to " + data["email"] + ". status: " + str(status))
        return status
    except Exception as e:
        logging.getLogger("error").error(traceback.format_exc())
        return False


def send_subscription_email(email, subscription_confirmation_url):
    data = dict()
    data["confirmation_url"] = subscription_confirmation_url
    data["subject"] = "Please Confirm The Subscription"
    data["email"] = email
    template = get_template("appname/emails/subscription.html")
    data["html_text"] = template.render(data)
    data["plain_text"] = strip_tags(data["html_text"])
    return send_email(data)
We have already covered sending emails from Django Application in detail in other tutorials.
- Sending an email using Gmail Account.
- Sending an email using office 365.
- Sending email using Mailgun API.
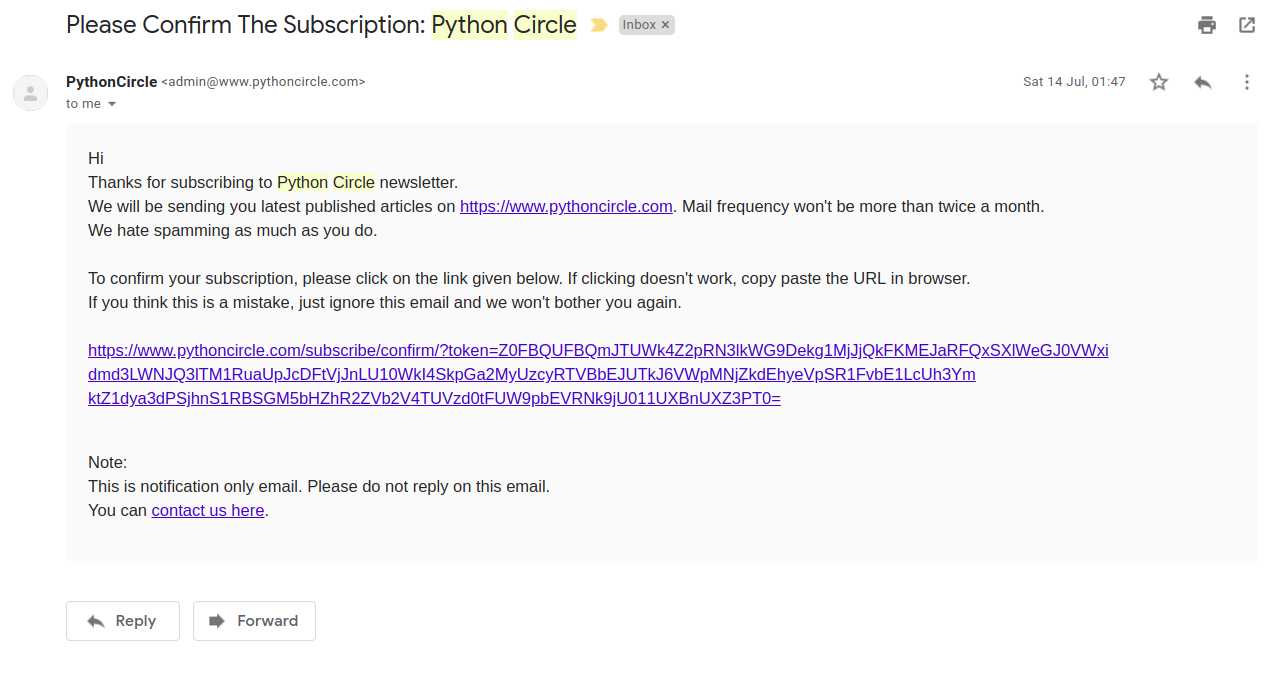
Email template appname/emails/subscription.html:
<div style="padding: 20px; background: #fafafa;font-size:15px;">
    Hi<br>
    Thanks for subscribing to {{ project_name }} newsletter.<br>
    We will be sending you latest published articles on <a href="{{ site_url }}">{{ site_url }}</a>. Mail frequency won't be more than twice a month.<br>
    We hate spamming as much as you do.<br>
    <br>
    To confirm your subscription, please click on the link given below. If clicking doesn't work, copy paste the URL in browser.<br>
    If you think this is a mistake, just ignore this email and we won't bother you again.
    <br>
    <br>
    <a href="{{ confirmation_url }}">{{ confirmation_url }}</a>

    <br>
    <br>
    <p>
        Note:<br>
        This is notification only email. Please do not reply on this email.<br>
        You can <a href="{{ contact_us_url }}">contact us here</a>.
    </p>
</div>
You need to pass all the values used in the template ( like project_name, contact_us_url, etc ) in data variable to function template.render(data).
Now if the email is sent successfully, return the success message else delete the database entry made previously and return an error message.
So complete code to create database entry and sending email in views.py would look like this:
save_status = save_email(email)

if save_status:
    token = encrypt(email + constants.SEPARATOR + str(time.time()))
    subscription_confirmation_url = request.build_absolute_uri(
        reverse('appname:subscription_confirmation')) + "?token=" + token
    status = email_utility.send_subscription_email(email, subscription_confirmation_url)
    if not status:
        SubscribeModel.objects.get(email=email).delete()
        logging.getLogger("info").info(
            "Deleted the record from Subscribe table for " + email + " as email sending failed. status: " + str(
                status))
    else:
        msg = "Mail sent to email Id '" + email + "'. Please confirm your subscription by clicking on " \
                                                  "confirmation link provided in email. " \
                                                  "Please check your spam folder as well."
        messages.success(request, msg)
else:
    msg = "Some error occurred. Please try in some time. Meanwhile we are looking into it."
    messages.error(request, msg)

return HttpResponseRedirect(reverse('appname:subscribe'))
Validating token and Confirming Subscription:
Add the below entries to urls.py file.
path(r'subscribe/confirm/', views.subscription_confirmation, name='subscription_confirmation'),
path(r'unsubscribe/', views.unsubscribe, name='unsubscribe'),
Once the user clicks the subscription confirmation link, we receive a GET request. Fetch the token from GET parameters. Decrypt it and validate it. If at any step token is not valid, return an error.
def subscription_confirmation(request):
    if "POST" == request.method:
        raise Http404

    token = request.GET.get("token", None)

    if not token:
        logging.getLogger("warning").warning("Invalid Link ")
        messages.error(request, "Invalid Link")
        return HttpResponseRedirect(reverse('appname:subscribe'))

    token = decrypt(token)
    if token:
        token = token.split(constants.SEPARATOR)
        email = token[0]
        print(email)
        initiate_time = token[1]  # time when email was sent , in epoch format. can be used for later calculations
        try:
            subscribe_model_instance = SubscribeModel.objects.get(email=email)
            subscribe_model_instance.status = constants.SUBSCRIBE_STATUS_CONFIRMED
            subscribe_model_instance.updated_date = utility.now()
            subscribe_model_instance.save()
            messages.success(request, "Subscription Confirmed. Thank you.")
        except ObjectDoesNotExist as e:
            logging.getLogger("warning").warning(traceback.format_exc())
            messages.error(request, "Invalid Link")
    else:
        logging.getLogger("warning").warning("Invalid token ")
        messages.error(request, "Invalid Link")

    return HttpResponseRedirect(reverse('appname:subscribe'))
Similarly, we will change the status to unsubscribed when the user clicks the unsubscribed link.
You can track if the email is being opened by the user or not and when.
Tips:
- Always store the credentials and API keys in a separate file and do not commit and push that file in the git repo. You can try Python Decouple.
- Refactor the code and break it into multiple files. For example, all validations should go in one file and email sending logic should be in another file.
- Use actual domain name and text in the email to avoid going mail to spam folder.
You can host your app on the PythonAnyWhere server for free.
Feel free to comment in case of any queries.
Related read:
https://dontrepeatyourself.org/post/django-blog-tutorial-part-6-setting-up-an-email-service/
