So you developed a course project which you need to host somewhere so that everyone can access it. Or you are working on some personal project and want to host it so that test users can test it. What do you do in such a scenario? You look for the best hosting service provider. Right?
So what is the best option to host your Django app?
We tried multiple hosting providers and found out that best choice for a Django app is Pythonanywhere.com. why? Find out below.
Features of Pythonanywhere:
- Only Python Django focused hosting service provider.
- Monthly payment option. $5 per month only.
- $10 off on yearly payment.
- IPython notebook to write code online.
- Free SSL certificate installation.
- APIs
- Scheduled Tasks
- Best customer care service. Immediate response on the forum or via email.
Steps to host the django app on Pythonanywhere:
Once you are done with development and testing on local, commit your code to Github. Pushing code to Github has two benefits. Your code remains safe in case your local machine got corrupted and Transferring code from local to pythonanywhere is easy. Also, version management is an added benefit.
Create a free account on pythonanywhere.com. Login to your account.
In the dashboard, click on the web tab. Now add a new web app.

Free account does not support custom domain names. So your app will go live on your-username.pythonanywhere.com. You need to upgrade to a paid account for custom domain names.
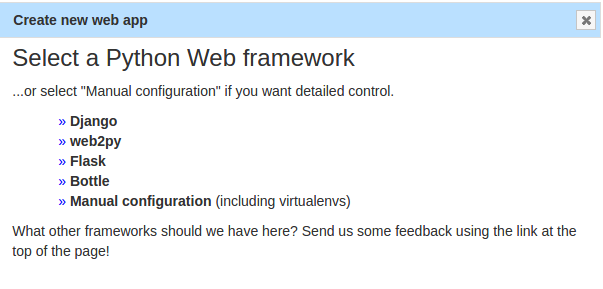
Select the web framework on the next screen. If you have already developed the app choose 'Manual Configuration'. If you want to develop the app on the server itself, choose 'Django'.

Since we assumed that you have already developed the app and pushed the code to Github or Bitbucket, we selected 'Manual Configuration'.
Select the python version on the next screen. The final screen will inform you that you need to set a wsgi file and virtual environment yourself. Proceed. Your web app is ready. Almost.

Now go to the console tab and start a bash console.
Git clone the repository you pushed on Github/Bitbucket. You can use my project repository. We will use references from this repository in the rest of the article.
$ git clone https://github.com/anuragrana/hellow-world-django.gitThis will create the hellow-world-django directory with project files in your current working directory.
In our article Building Django App in less than 5 minutes, we discussed how to install and create a virtual environment. Please follow the same steps here to create a virtual environment with Python 3. Let's say the name of the virtual environment created is virtenv.
Install Django in virtual environment. pip install django.
Now go to the files tab and edit the settings.py file. Set debug to False and Allowed host to ["*"] . These changes will not show debug information in the browser if something goes wrong. Allowed hosts setting will make sure which hosts can access the code. Setting it to * is not safe, but for now, it will do the task. Make sure to change it to actual hostname on the production environment.
DEBUG = False
ALLOWED_HOSTS = ["*"]  # or ALLOWED_HOSTS = ["code.pythonanywhere.com"] - recommended.
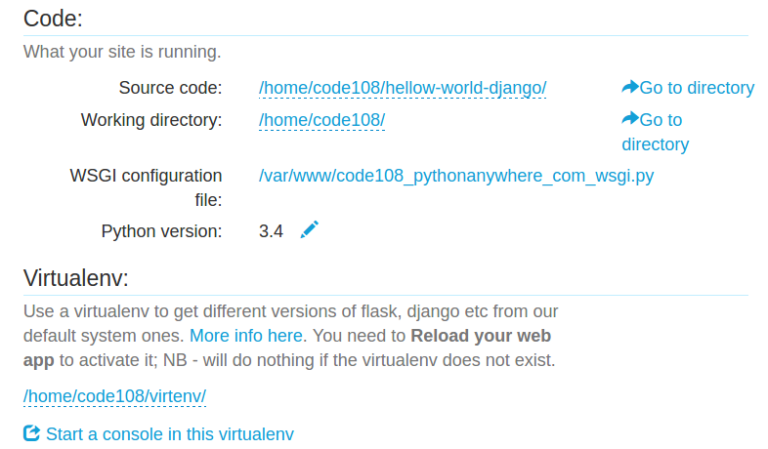
Now go to web tab and Fill source code directory, /home/code108/hellow-world-django/ in our case. Fill virtual environment directory, /home/code108/virtenv/ in our case. Save the settings.

You can define static and media directory and URLs but they are not required in our project.
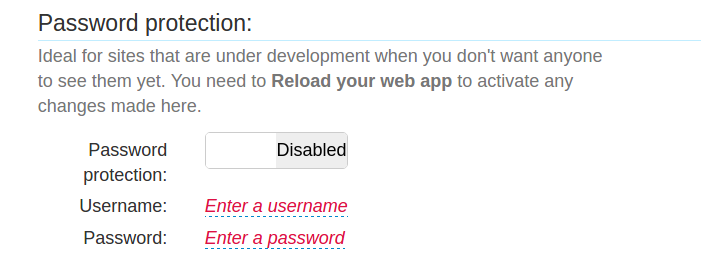
You can also set the username and password on your app so that not everyone can access the website.

Edit the WSGI configuration file. Comment the line in ++++++ Hello World +++++ section. Go to +++++++ DJANGO +++++ section and un-comment the lines so that code looks like as below.
# +++++++++++ DJANGO +++++++++++
# To use your own django app use code like this:
import os
import sys
#
## assuming your django settings file is at '/home/code108/mysite/mysite/settings.py'
## and your manage.py is is at '/home/code108/mysite/manage.py'
path = '/home/code108/hellow-world-django'
if path not in sys.path:
    sys.path.append(path)
#
os.environ['DJANGO_SETTINGS_MODULE'] = 'myproject.settings'
#
## then, for django >=1.5:
from django.core.wsgi import get_wsgi_application
application = get_wsgi_application()
## or, for older django <=1.4
#import django.core.handlers.wsgi
#application = django.core.handlers.wsgi.WSGIHandler()
Save WSGI settings file and reload the web app on the web tab.
Open the link in new tab. Since we have a helloworld app inside our project, URL should be <site-address>/helloworld/. In our case it is code108.pythonanywhere.com/helloworld . You can see the template you created on this URL.
For paid accounts process it a bit different. In a paid account, you are given CNAME which you need to update with your domain name service provider.
Refer this sort video on how to host hello world Django app on pythonanywhere free account.
If you feel hosting on pythonanywhere.com is smooth, create a free account today and host your first app and show it to your friends.
Feel free to comment for any query.


